March 2012 Desktop Calendar

Here is this months calendar, inspired by this washi tape table.

Stripes + Candy colours.


I hope you like this one! 
I'm in love with next months calendar. So much, i kinda wish I could marry it.
Can't wait to post it next month. 

Please feel free to share this around with your friends, family, on your Facebook page on twitter or pin it on interest. 

Thanks a bunch! Have a great month. 

tara louise. 


Read more...

UK + Europe bound

I'm pretty excited (+ well stressed out) that the husband and I are off to travel around the UK and Europe for a month on Sunday. Apart from doing all the normal things you do when you get ready to travel - book flights, accommodation, research dairy free/vegan cafes in the places we're going (you know, because we all do this) - one of the other things that takes up a large majority of my organisation and time is spent on deciding what to take to wear.

I'm a fairly light traveller (on the way over anyway) and am getting better at this as i get older and travel more. This time I'm taking a suitcase (I've travelled with a backpack most times over the past few years) and a husband who is the opposite of a light packer (why wouldn't he need to take 32 shirts for a month long stay in brazil where he barely wears a shirt? true story - i had to pack his backpack at the end for him and counted them - and made him leave about half there for his cousins). I've been researching winter styling, winter/spring trends and have stumbled across one or two travelling lightly tips on pinterest.

I found this on travelista on how to pack lightly and mix and match outfits.


Source: travelista.com via Tara on Pinterest


I've tried to base my suitcase packing on this model. As it is rather cold in the UK + Europe at the moment I'll be taking a lot more long sleeved options and things to layer. 


Some of my inspiration pictures:


And so following these bits of style inspiration, I pulled together a virtual packing list on polyvore. Her'es what I plan on taking + a bit more. I don't have all these exact outfits, but have picked them based on similarities to what I have in my own wardrobe. 


1. Shirts Jumpers Bottoms


2. Dresses Shoes Accessories

2. Dresses Shoes Accessories

3. The Real Accessories. So as I said I'll be taking more than what I have here. At the moment I have oodles sitting on top of my suitcase and have to edit lots of pieces. I am aiming on taking about a half a suitcase over and filling up the rest of mine and husbands suitcase with goodies from topshop, h+m, zara, primark and oh so many other amazing shops.


how do you plan your wardrobe for travelling??

tara louise. 

Read more...

An inspiring start to the week

A QUICK INTRODUCTION:  I found this video this morning on one of my creatively charged friends facebook pages. This guy is so refreshing + inspiring. If I were to walk down the street near him, I'd probably think he was some dude wacked outta his brain on crack or something, but watch the little video and found out his past and story behind him. Really makes me realise I judge people too quickly and to not worry about what other people think so much. Check it out.


I hope this inspires you as much as it's inspired me and kick starts your week.

tara louise.

Read more...

My week in photos.

I thought this was published last night, but apparently not, so here I go again.


This week I painted a red heart on my nails for valentines day. I relaxed on the couch after work with my poppy (that's the cat) strewn over me. I took inventories in some of our units at work. The boys practised the pledge. They became Aussies the next day (no more immigration forms to sign and fill out  - YAY!!!). We took a trip to Southbank for lunch while we were in Brisbane. We then had 1kg of ribs to celebrate their citizenship (mum and I shared that kilo by the way). No photos of Friday and Saturday: friday arvo sucked, saturday was spent working, relaxing and cleaning. Then yesterday we booked our tickets for EuroDisney.

Hope you had a great week last week and in my next post inspires you to have a great week.

tara louise.

Read more...

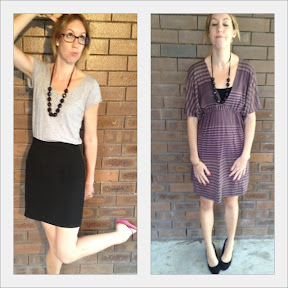
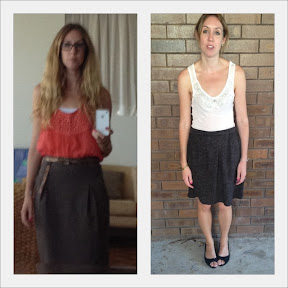
What I wore to work

A few silly poses and one where you can tell I've well and truly had enough sums up my week pretty well.


I had a 4 day week this past week which was nice, but then had a shocker Friday arvo. My Facebook status went something like this - I believe we should shut up shop at 2pm on Fridays because the sh*t hits the fan from then onwards.

Are your Friday arvos at work like this? I hate Friday arvos. They suck big time.

Hope your working week ended a nicer note than mine. I turned mine around with an hours Zumba and a bit of tv and some blogs. How do you turn around crappy days?

Tara Louise.


Read more...

A little animation

how to make a animated gif

Last weekend i made cake pops for the first time and had my first taste of a cake pop.
i made gluten and dairy free ones with vanilla cake and carob ganache with hundreds and thousands.

they were yum. very sweet though.
i might have a go at making some different types + sell them at the handmade market.

tara louise.


Read more...

DIY: Chalkboard Labels

Chalkboard labels have been everywhere lately and you can pay an arm and a leg for them. I'm a cheapskate  always looking for a cheaper diy version for most things and thought there must be one for this.
Ages ago I found a few DIYs on pinterest where you directly paint the glass jar with chalkboard paint (i'm still borrowing the laptop and it's a mac and i can't work out how to save/copy a picture to paste in here, so sorry - no pictures to demonstrate what i'm carrying on about).
Now, I'm also lazy and haven't been in the mood to sit down and tape off a heap of jars and then paint them all. As a little experiment Saturday arvo, I had a go with this tutorial. I LOVE it! I can't believe it actually worked either. I was pretty excited and started reorganising my filthy kitchen at about 5pm on Saturday arvo.

It's a simple tutorial, so please keep reading.

STEP 1: Take a sheet of label stickers (any type will do) and simply paint the chalkboard paint onto them. 
Allow it to dry.


STEP 2: Peel off a sticker, stick it onto your jar. 


 STEP 3: Write on it in chalk what will be in it. Then fill your jar.


So simple! I'm so excited about this tutorial. I really am. 

I found it easier to write on the labels before you peel them. I also found it easier to do this with your chalk:

shave off the end with a stanley knife to make a "pencil" and wrapped the length in masking tape so my fingers didn't get all chalky. 


Have a go at this - it's very satisfying! 
I think the next thing on my experimentation list with this is to make some hot pink chalkboard paint and have a go with that. 

i'd love to see your versions of this. put the photos up on my Facebook page. 

tara louise. 


Read more...

  © Blogger template Shush by Ourblogtemplates.com 2009

Back to TOP