Showing posts with label easyPeasy. Show all posts

DIY: Studded Bag


This DIY is such a simple one. I had a bag which I found in Kmart for $10 but it needed jazzing up a bit, so I grabbed some studs (these can be found in bead shops or craft stores. I got mine from here) and one by one while watching TV fixed them to the bag. I found the easiest way to do this was to pierce the stud through the leather/fabric a few at a time. If you happen to pierce the lining, then pull the lining away from the stud, then with some pliers, fold the spikes inwards. I did a couple of google searches on the correct way to do this and some said to fold the prongs outwards - I highly disagree. I would have no fingers left if I'd done it this way. I vote for folding the prongs in. Work your way around the bag, adding studs where necessary. For my bag, I bought 50 studs but only used about 30. And that's pretty much it. Super Simple and a way to pass the time while watching mindless TV that you don't have to think about or concentrate on. 

tara louise. 

Read more...

YUM: frozen yoghurt drops


FROZEN YOGHURT DROPS

I am seriously in love with these right now. 
A quick story: i hate strawberry yoghurt. always have always will.
My husband bought me strawberry yoghurt last week (lactose free of course).
I was grossed out by it and wondered if i'd find it as yuck frozen.
Turns out I didn't. Score.

I found this recipe - I feel a bit silly calling it a recipe - on pinterest right here.

Here is the recipe:

Put yoghurt into a snap lock bag.
Snip one corner - this is your non-fancy schmancy piping bag.
Pipe little dots onto a plate.
Shove it in the freezer.
Pick them off and put them in a container and leave in the freezer.


I am loving snacking on them after dinner or lunch.
The ultimate in healthy snacking.

I apologise for the crappy photos too.

Try these. They are just yum.
I need to make some more.

tara louise.

Read more...

YUM: Bliss Balls


these are absolutely delish.
a must try!

tara louise.

Read more...

DIY: Basic Stamp


Here is a DIY to make a stamp using a few bits of cardboard, some tape and foam. 


Here is the stamp in use...


The possibilities are endless with this quick DIY. 

Wrapping Paper | Patterned Paper | Printed fabric

tara louise.

Read more...

DIY: Fabric Tape


i've had this tutorial in the pipeline for, well ages. so here it is! 

i have a huge love affair with mt tape and saw some fabric tape in a shop once and realised i could quite easily make it myself. and in the pretty fabrics i liked. it's so simple.


Here are a few ways of using your new fabric tape - and I know some of it is mt tape, but you have to use your imagine and do the same ideas with fabric tape. 


one | two | three | four | five | six | seven


The rest really is left up to you + your creativity. 

tara louise.

Read more...

FOOD: DIY Truffles

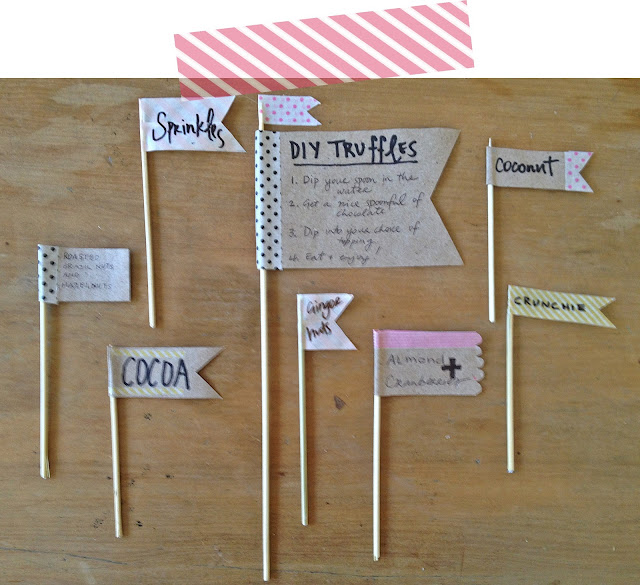
i don't always like to toot my own horn [insert giggle here], but i have to tell you, the truffles i made yesterday tasted a-MAZE-ing. they were that good. with easter upon us and little old me unable to eat delights such as cadbury creme eggs *sob* i came up with an alternative. a quick google search found these truffles by jamie oliver. they are awesomeness on a spoon (that's a word ok!). 

my version:


we had a pretty good dessert spread after our good friday bbq and we did enjoy the truffles.
 a lot.


i will definitely be making these again. it's a great easy recipe. 
i used 70% cocoa lindt chocolate (which has no milk products in it) and used lactose free cream.
these are crazy rich truffles, so if you can eat it with milk chocolate, i'd probably use one block of milk and 2 of dark chocolate. 

go and make these tomorrow or monday - there's still 2 days of easter left. 
or make them for a dinner party. they are a fun dessert. 

enjoy.

tara louise. 

PS. I'm back now and have a kinda working computer, so there will be a thousand and one posts on my trip to come. oh yay you say! 

Read more...

DIY: Chalkboard Labels

Chalkboard labels have been everywhere lately and you can pay an arm and a leg for them. I'm a cheapskate  always looking for a cheaper diy version for most things and thought there must be one for this.
Ages ago I found a few DIYs on pinterest where you directly paint the glass jar with chalkboard paint (i'm still borrowing the laptop and it's a mac and i can't work out how to save/copy a picture to paste in here, so sorry - no pictures to demonstrate what i'm carrying on about).
Now, I'm also lazy and haven't been in the mood to sit down and tape off a heap of jars and then paint them all. As a little experiment Saturday arvo, I had a go with this tutorial. I LOVE it! I can't believe it actually worked either. I was pretty excited and started reorganising my filthy kitchen at about 5pm on Saturday arvo.

It's a simple tutorial, so please keep reading.

STEP 1: Take a sheet of label stickers (any type will do) and simply paint the chalkboard paint onto them. 
Allow it to dry.


STEP 2: Peel off a sticker, stick it onto your jar. 


 STEP 3: Write on it in chalk what will be in it. Then fill your jar.


So simple! I'm so excited about this tutorial. I really am. 

I found it easier to write on the labels before you peel them. I also found it easier to do this with your chalk:

shave off the end with a stanley knife to make a "pencil" and wrapped the length in masking tape so my fingers didn't get all chalky. 


Have a go at this - it's very satisfying! 
I think the next thing on my experimentation list with this is to make some hot pink chalkboard paint and have a go with that. 

i'd love to see your versions of this. put the photos up on my Facebook page. 

tara louise. 


Read more...

DIY: Pretty Pinboard

Here is the quickest and easiest diy around that can be completely suited to each and evry person making it. It's a little bit embarrasing calling it a tutorial even, so diy it is!


the pretty pinboard


take an old corkboard, a new corkboard or a canvas + some pretty fabric you love
(but haven't been able to bring yourself to cut).


then lay the fabric on the floor with the wrong side facing up. lay the corkboard face down on top of it. next you need to tack the fabric to the back of it.

so fold one side of the fabric towards the corkboard and pin it with a thumb tack - a hammer might come in handy if your corkboard has a wooden back. next do the same thing to the opposite side. follow the numbers in the picture below and you'll get the idea of it.


and that's it. done!
easy huh!?


as you can see, i have a couple of these in my room and i love that they are prettier than normal cork boards.


have a go at making some. If you do, i'd love to see a photo of the finished product!
post it on my facebook wall. please.

tara louise.


Read more...

Last minute speedy WREATH TUTORIAL

i've been researching my wreath for this year for quite a while now. i finally settled on a design a while ago and finally got around to doing it last week - because well i tend to leave everything to the last minute. and well it's sat there since because i don't really love it. it needed something extra and i couldn't work out what - and well with christmas rapidly approaching, i dont really have time to sit and wait for inspiration to come.

i sat this afternoon looking around my sewing room for inspiration and this is what i came up with...


(a dead give away i live in qld is the fly screen.....not very pretty, but practical and necessary)


follow on for the super easy tutorial...

so you can see what i started with.....i planned on incorporating this into the wreath.
you'll need all the things in the photo on the right + sticky tape, mt tape/other pretty tape/fabric and a sewing machine.

pretty simple this step....just keep sewing and place the triangles into the sewing foot as you go.

wrap the length of triangles around the edges of the embroidery hoop taping as you go to hold them in place.

on the left was my original vision...but it looked like crap. so i ditched the leaves/feathers idea.

instead i just covered the ugly tape with the mt tape. you could also wrap fabric around it to cover the tape. i'd probably still use both too for added support and strength.


i tied mine onto the flyscreen with bakers twine. but fabric would work too or any string really.

and that's husband in the background.


i love that it's not traditional, but the circular hoop means wreath to me.

if you re-make this or are inspired by this (because you, like me also leave everything to the last minute and haven't organised a wreath yet), i'd love to see your version.
please put it on facebook and be sure to tag tara louise designs.

tara louise.

Read more...

stamp it

on the weekend i needed a stamp quickly. i contemplated wire, cutting one out of rubber and then grabbed my diy stamp kit. i only have one stamp holder thingy and didn't want to take out the letters i had in it. so....i came up with this:


i simply grabbed a piece of crazy sticky tape and popped it on a rubber i had and then placed the stamp letters onto the tape. i wasn't sure how these would hold, but they have worked a charm so far!

it comes out very similar to this....just slightly more crooked.


i was pretty impressed with myself after this thought!

tara louise.

Read more...

How To: "fake" mt tape

so by "fake"mt tape, i mean digital mt tape i suppose. i love the look of mt tape and created some the other day while playing around on the computer. here is the tutorial:

Start by opening a blank/new workspace ina  photo editing program. i use photoscape, which is a free download and is like photoshop but simpler to use. This tutorial is to create mt tape that is striped. I't's easy and looks effective.

 step 1: Draw diagonal lines on page. Once you do one, you can clone it (press the + button to the left of the box that appears around it) and just keep adding until you have a few.


step 2: When you have a decent amount of lines and you like the way it is all spaced, press the {photo + objects} button. This will flatten the image and makes the lines and everything just one image.


step 3: now go to the crop tab and crop your picture into a long rectangle....this basically shows you know what your mt tape will look like.

You can leave it here if you like this look. Skip through to step 8 step 7 which shows you how to apply it. To add more layers to your tape....continue on and do the next couple of steps.


Step 4:  Repeat the same steps as before to draw another set of lines in. Change the colour or add dots. It's really up to you!


Step 5: Press {photo+ objects} again and this box will pop up. Make sure you tick the {combine all objects with photo} or it says something along those lines. This will erase everything that went off the edges of your "tape".


Step 6:  This is your completed digital mt tape.


Read on to see how to apply it to images now.


Step 7:  Open the image you want the tape to be taped with. Click the picture icon and click {photo}. This allows you to add a photo onto your chosen image.


Step 8:  Your "tape" should now be on your image. Slide the opacity slider to the left so it becomes transparent. Have you ever seen opaque mt tape??? nope, i didn't think so. This gives it the papery see through look the tape has.


Step 9: Use the rotate arrows and spin it around so it  looks like it is sticking the image to the background. I think it always looks best if you leave it on an angle. Then save your image as....make sure to tick the box that says {enlarge your image to include objects outside the image}, this means the top of your mt tape won't be chopped off.


and below is the finished result:


very sweet i think!

if you make these, it would be great to put them on facebook, so everyone else can see your creations and we can all use each others!

tara louise.


Read more...

i've been busy....continued

and carrying on finally with the last post.....the bits and bobs i've been making the past week:

item three: drawers
when: last sunday
inspired by: numerous pins on pinterest


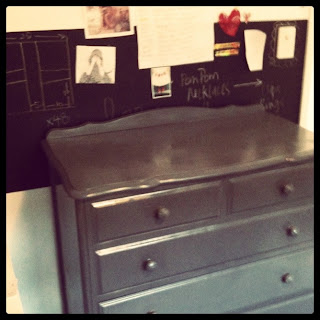
first pics were the before photos. this was a hamme-down (the way i say hand me down) from a friend and it's been my cupboard/drawers for a few years now. it's pretty but not very practical. the paint has been flaking off and i've never got around to painting it. until last sunday. this went hand in hand with cleaning out my cupboards. so it got a lick (spray in my case) of paint - in a  neutral colour as this will be our babies drawers when we have babies - and now lives in my sewing room.

there's nothing in it yet.
i'm getting to that part.


item four: cross top + skirt
when: over the last week [cross top] + this morning [skirt]
inspired by: this polly dolly post


this was the last polly dolly i did. i loved this set. especially the 2 outfits on the edges. and that bag. far out i love that bag! but the thing i knew i could create was the outfit circled. it's been in my mind awhile now. so decided to re-create it.

the cross top: a quick tutorial


hard to call this a tutorial really.
i bleached a shirt. it started out like this:


a few days of sitting in bleach later and i had a white shirt again. i specifically chose a shirt in kmart that said DO NOT BLEACH on it. figured then if i bleached it it would go back to white! and i must say it took a while longer than i thought. i was scared the bleach would eat the shirt if i just left it to soak and had read on numerous blogs that you were supposed to bleach and rinse and repeat. i bleached it (in diluted bleach) and rinsed slightly then let it sit for a bit uot of the bleach. it seemed to work better this way. then repeated this a few times. i'm pretty happy with the whiteness now.

i then got together my supplies: paint, masking tape, new white top, fabric fixative anda paintbrush. plus an old newspaper or cardboard to put in the middle of your shirt.

mark out the cross with tape...i actually used a ruler for this. i eyeball everything but found the ruler/tape measure to be better. it would have pissed me off if the corss was a bit crooked or one part of it was. i painted the edges first, then moved my into the middle. when i do this, i find it's best if you almost push the paint into the fibers of the fabric rather than just paint it in. really get the paint in there. this seems to make the paint wear better and looks more like it's been printed on.

then chuck it in the dryer for half an hour to really set the paint when it's all dry.
took me hardly any time at all. the bleaching took the longest.


the skirt:


is in the fabric above. i don't have any photos of it yet. it's a midi skirt and has an elasticated back. and this happened by complete accident which is amazing because i've been wanting to attempt this type of waistband for ages.
i started this before our fathers day brekky this morning and finished it about half an hour ago.
it has pockets and everything.
although i may need to unpick those and move them up the skirt a bit.

(i also just "made" the "mt tape" that the fabric is "stuck on"with too. might do a quick tutorial for that over the next week)

(and i apologise for the amount of  "inverted commas" in the previous sentence!)

what have you been making lately?

tara louise.


Read more...

  © Blogger template Shush by Ourblogtemplates.com 2009

Back to TOP